What is Ldpinch?
Ldpinch is an old info-stealer malware, which tries to steal credentials for different applications from a victim's PC. The malware runs on Windows Systems with 32bit support and is a regular Portable Executable (PE).
Why unpacking?
Like most malware, Ldpinch is packed to make reverse-engineering and manual analysis more difficult. In a "packed" file, the assembly instructions which describe the behavior of the program are not directly available in the binary on disk. Instead, when the malware is loaded into memory, an unpacker decrypts the encrypted instructions to enable the CPU to execute them. If a malware analyst wants to reverse-engineer the malware, they first have to unpack it. Otherwise any disassembler will only display meaningless gibberish.
How to unpack Ldpinch
In this section we will see how Ldpinch can be statically unpacked in such a way that all assembly instructions become visible in a disassembler.
The SHA256 of the malware sample used is: cc65200e7c748e095f65a8d22ecf8618257cc1b2163e1f9df407a0a47ae17b79
We will use Cutter to reverse-engineer the malware samples. Cutter is a free and open-source disassembler and reverse-engineering tool, based on the radare2 reverse-engineering suite.
First impression
After opening the sample in Cutter, two things immediately stand out:
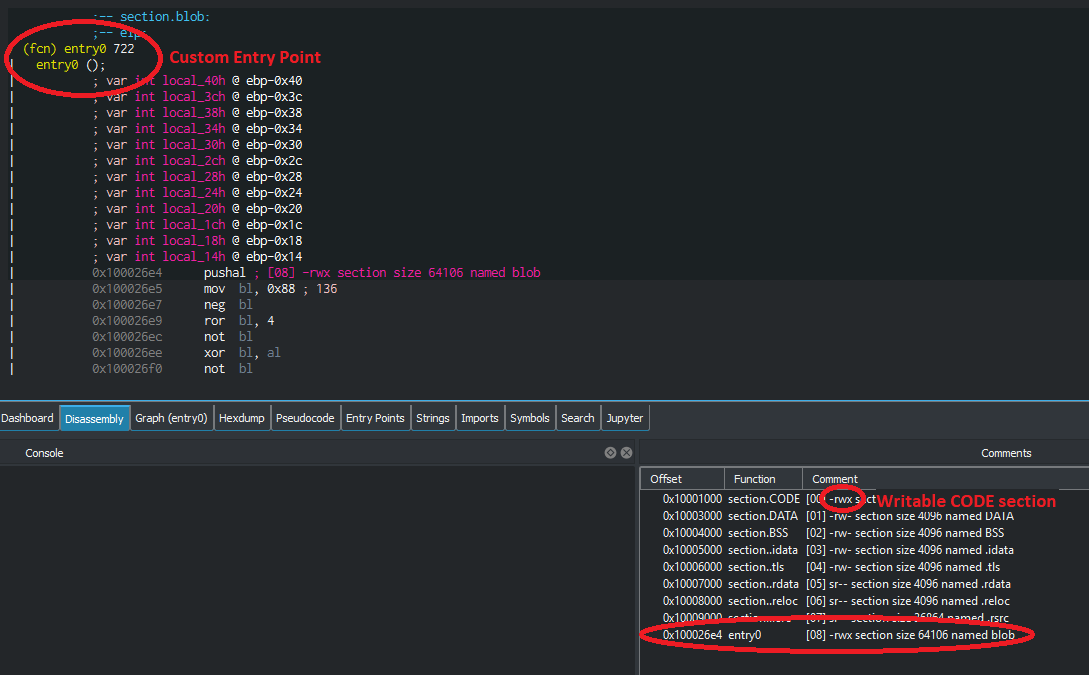
First, usually a PE file has the entry point somewhere in the NTDLL, which runs some initialization code. After that, it is handed over to the entry point of the application itself. In the case of Ldpinch, the entry point is a custom entry point appended right after the CODE section of the PE file. Cutter calls this entry0 at the adress 0x100026e4.
The second unusual property of the binary is that the CODE section has the write attribute. This means that it is possible to overwrite code, while the sample is executed. For security reasons, the CODE section is usually read and execute only.
These two properties are a strong indicator for a packed malware sample. The malware needs to overwrite the packed code with unpacked code, which is the reason for the writable CODE section. The unpacker itself needs to be somewhere, so the malware authors just appended it to the CODE section.
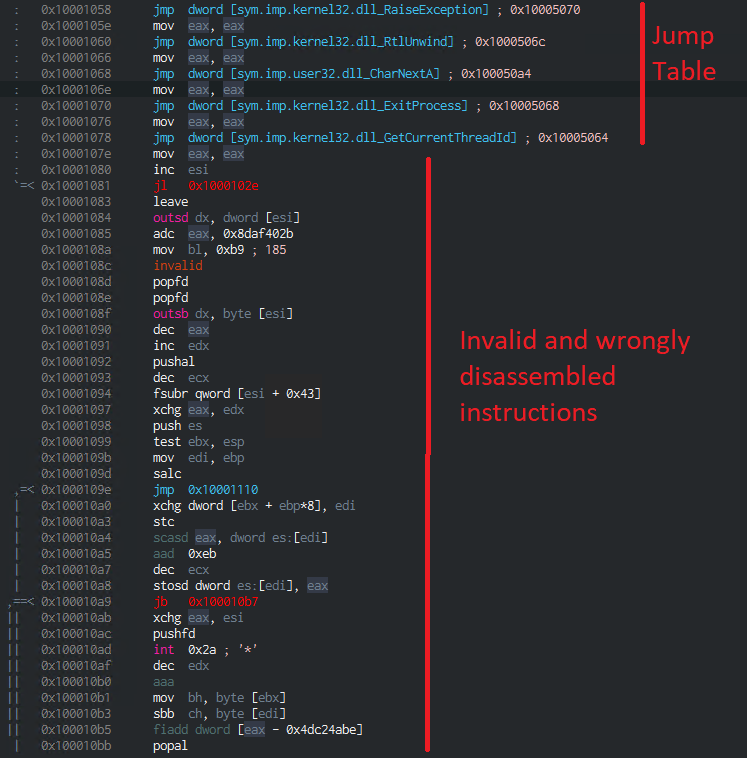
To verify our assumption, we take a jump to the CODE section by double clicking on it in the comments window. You should now see a few jumps which we can ignore. Right after the jumps, the code for the application should start, but instead there are a lot of assembly instructions which make no sense in this order and even a few invalid instructions. This is typical for packed code. The disassembler tries its best to disassemble the machine code to human readable assembly instructions, but in this case the output is either invalid or simply wrong. This confirms our suspicion that the CODE section is packed.
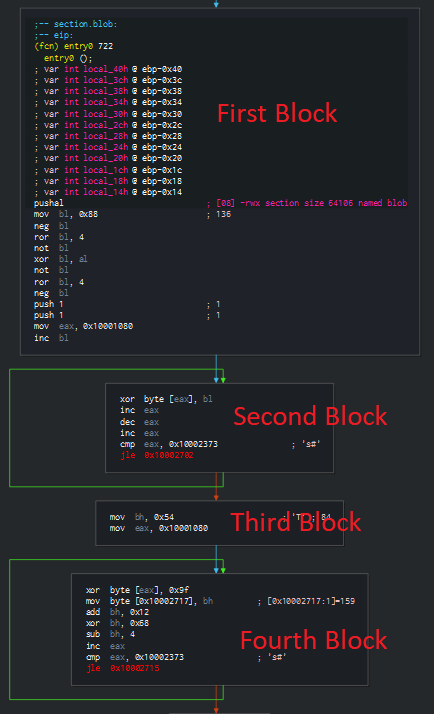
Our objective is therefore to make the code readable again. To achieve this, we need to write an unpacker. Another option would be dynamic unpacking, where we execute the sample until it unpacked itself in memory and then dump the unpacked code to disk. But in this case we want to write a static unpacker, so we do not need to execute the malware samples. Let's jump back to the entry0 entry point to see if we find anything useful there. If we switch to the graph view of Cutter, we see four basic blocks followed by a fifth with invalid instructions.
The second and the fourth block contains a loop, which seems to run over some memory region. This is typical for an unpacker. Most likely the first four blocks are the unpacker. The only thing we have to do now is find out how it works and implement our own unpacker.
Basic Block Walkthrough
In this section we will walk through all four basic blocks and extract what they do to be able to implement our own unpacker.
First Block
pushal
mov bl, 0x88
neg bl          // Multiply by -1
ror bl, 4       // Rotate right by 4 bits. If there is an overflow, push the bit falling out back on the other site.
not bl          // All bit that were set are unset. All bits that were not set are set.
xor bl, al
not bl
ror bl, 4
neg bl
push 1
push 1
mov eax, 0x10001080
inc bl
When looking at the assembly code, we can observe a few things.
- Variable bl of size byte(8 Bit) gets the value 0x88.
- 2x neg bl does nothing (two times negating something is the same as not negating it).
- 2x not bl does nothing (two times inverting something is the same as not inverting it).
- 2x ror bl does nothing (rolling a byte 2x by 4 bits = rolling it by one byte = the same as not rolling it at all).
- bl is incremented by 1 to 0x89.
- The push operation does not alter the value in bl.
If we remove all the instructions which have no impact at all, or are uninteresting for us, we can boil the first basic block down to the following code.
mov bl, 0x88
mov eax, 0x10001080
inc bl
In conclusion: bl = 0x89 and eax = 0x10001080
Second Block
Let's have a look at the second basic block, which contains a loop.
xor byte [eax], bl
inc eax
dec eax
inc eax
cmp eax, 0x10002373
jle 0x10002373
Again, some observations about the code.
- The value at the address in eax is xored with 0x89.
- There is a loop that runs until eax has the value 0x10002373.
- 2x inc and 1x dec is just 1x inc. eax is incremented by 1 in every loop iteration.
In conclusion: The unpacker iterates over the memory region 0x10001080 - 010002373 and computes every byte in the region xor 0x89. This is a typical decyption loop, where 0x89 is the key. The second block in C code would be:
for(auto i = start; i <= end; i++)
{
    buffer[i] ^= 0x89;
}
Third Block
The third code is very short and doesn't do much. Lets have a short look at it.
mov bh, 0x54
mov eax, 0x10001080
In conclusion: The value 0x54 is stored in bh and eax is set back to the start of the packed memory region.
Fourth Block
The fourth block contains a loop very similar to the one we saw in the second block.
xor byte [eax], bl
inc eax
dec eax
inc eax
cmp eax, 0x10002373
jle 0x10002373
This is the most interesting part of the unpacker. Here's why:
- It's a loop over the packed region 0x10001080 - 0x10002373. Every byte in that region is xored with 0x9f.
- But the value 0x9f is overwritten in every iteration with the value in bh! The address 0x10002717 is exactly where the value 0x9f is written in code.
- bh starts with 0x54 and every round the computation bh += 0x12; bh ^= 0x68; bh -= 0x04 takes place. The result is then used to xor the packed byte.
The basic block number four contains self modifying code. Every iteration, the code modifies itself and computes a new key to xor with the packed byte in the packed code region. The same would look like this in C code:
xor byte [eax], bl
inc eax
dec eax
inc eax
cmp eax, 0x10002373
jle 0x10002373
The final unpacker
With the information we gathered above, we can create an unpacker routine in C which takes the PE file and the start and end address of the packed memory region as arguments. Attention: The start and end address have to be physical addresses and not the virtual addresses used by Cutter. The complete unpacker routine looks like this:
void unpack(uint32_t start, uint32_t end, byte *buffer)
{
	for(auto i = start; i <= end; i++)
	{
		buffer[i] ^= 0x89;
	}

	buffer[start] ^= 0x9f;
	byte key = 0x54;
	for(auto i = start + 1; i <= end; i++)
	{
		buffer[i] ^= key;
		key += 0x12;
		key ^= 0x68;
		key -= 0x4;
	}

}
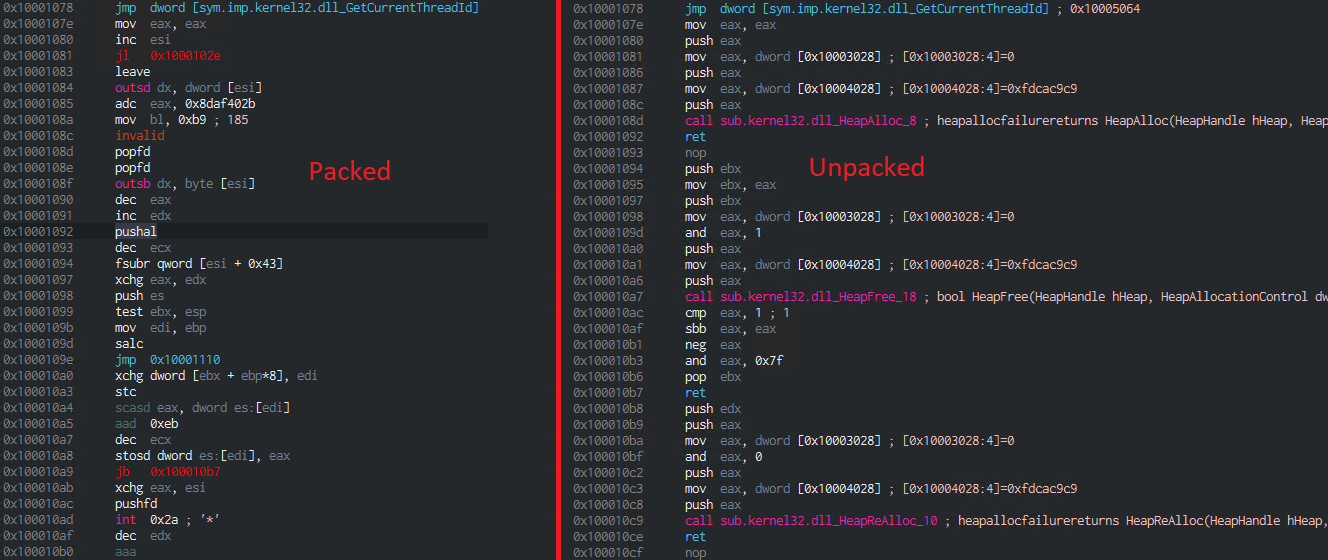
If we apply the routine to the Ldpinch binary, we get an unpacked version of the malware. For comparison, lets have a look at the CODE section before the unpacking and after it is unpacked.
It's easy to see that the code in the CODE section, which was gibberish before, is now readable assembly. We reached our goal of unpacking the Ldpinch malware with a static unpacker. Now, the reverse-engineering of the functionality of the malware can take place.
You can find the complete code for the unpacker on our Github page: Ldpinch Unpacker Code


